Saturday 28 February 2009

nutmeg preserve


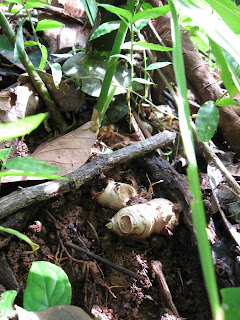
Nutmeg harvest is in full swing - again: the nutmeg seems to fruit every 2-3 months, and sporadically between times. It's a pretty tree, medium sized with shiny leaves in a pleasant shade of green and fruits that look a lot like apricots, and it comes in both genders, one needs to have several trees to ensure a good crop. When the fruits ripen they split in two and fall to the ground revealing the glossy nutmeg seed inside and the incredible red lacy aril: mace. the first time I saw mace I was spellbound by the colour and the beauty, and that such a thing could be hidden away inside a fleshy peachy fruit.

The Nutmeg tree is native to the Spice Islands (Moluccas) and was at one time a fiercely guarded secret by Dutch colonialists who were known to travel to neighboring islands to destroy Nutmeg harvests. Later French and British colonialists exported the trees to Madagascar and the Caribbean. Grenada, the Spice Island of the Caribbean, is famous for its nutmeg: the country's flag is red, yellow and green in representation and one even appears on the left of the flag. Both nutmeg and mace are widely used in cooking imparting a sweet, warm woodsy flavor to drinks, puddings, cakes and savory dishes. Nutmeg has long been supposed to have magical properties, in medieval times it was carried as a talisman to protect against misfortune and illness, and even used to attract admirers! Medicinally it is used to aid digestion.

The mace is removed after harvest and dried separately, the colour fades from a brilliant red to a deep orange amber, and the seed shrinks a little, the nutmeg inside can be heard rattling around. Fresh nutmeg has to be refrigerated, but dry can keep for a very long time.

The fruits have for a long time been left to rot where they fell, becoming compost for the tree, until that is I discovered that they are edible! The flesh is very woody and while subtly flavoured like nutmeg, hardly sweet. I've been making jam and it's very good. It comes out with an apple butter texture and a warm, sweet nutmeg flavour - excellent with ginger scones!

-nutmeg fruits, the fresher the better, but soft is fine too
-brown sugar
-a little nutmeg, cinnamon and ginger (last two are optional)

Wash, peel and cut the fruit finely. Add water to cover and boil until soft, and until 1/3rd of the water has boiled off. Blend to a paste, weigh and add an equal amount of brown sugar. Add some grated nutmeg, about 1/4 teaspoon for every pound of fruit - depending on taste of course, cinnamon and ginger can also be added at this stage. Return to pan and bring to a boil, stirring constantly. Cook until the preserve thickens (a spoon will make a clean trail when drawn across the bottom of the pan) - you can also test for readiness by dipping a spoon and allowing it to cool - if this sets, then your preserve is ready. Bottle in clean, sterilized jars and seal in a hot water bath. Enjoy!

Monday 23 February 2009

farm, what farm?

It seems that most of my posts lately have been about what happens indoors rather than what goes on in the outside, green part of the farm.

Mostly we grow fruits and spices and this is the lowest season of our year. We harvested the last of the black pepper in January and won't harvest more until May; the salak (snakefruit) has been intermittent and spotty recently and hasn't provided a solid harvest, we've dried a lot of the crop and propagated seeds for the nursery. Our ginger harvest is fairly steady and I've been busy making crystallized ginger for the market as well as ginger syrup and scones.

But slowly things are beginning to appear, the nutmegs are looking nice and heavy and are almost ready to pick. They drop when ready and are easy to harvest. And the cas is coming into season again. I'll be making fruit leather before February's out I hope.

But for now it's rainy and I have work to do indoors. Our tempeh is building a reputation locally and we now sell to two restaurants, I'd like to add a couple more. And I've been really enjoying working with ferments. I have sourdough bread rising above my head now, while behind me sits vats of seaweed kimchi.

Wednesday 18 February 2009

cacao


I'm roasting cacao for granola bars. It's a fun job, the hard stone sound of dried bean against cast iron skillet, the growing scent of chocolate and the sudden pop as the first bean splits its shell. Then I can take them off the heat and wait until they are cool enough to handle before I shell them. Cacao is much easier to shell while it's still hot.
The botanical name for the cacao tree is theobroma cacao, Greek for food of the gods, it was revered by the native Indians as a food of the gods. The story goes that the first cacao tree grew from the dead body of Sura, the co-creator god of south and central america. It was used ceremoniously, as medicine and as money. Is this where the expression ‘money grows on trees’ comes from? In the Mayan culture a porter earned 100 cacao beans a day: the price of a hare; an avocado cost one bean; a fish wrapped in a corn husk cost 3. It was taken or exchanged during both religious and civic ceremonies, for example at a wedding the bride and groom exchanged 5 beans.
The trees look a little like apple trees, fairly short and gnarled. The pods grow from the stems and trunk and are shaped like a rugby ball but ridged and knobbly, they vary in colour from a minty green to a deep dark maroon. Inside the beans hang from a sinewy tough central stem – a bit like the middle of a tangerine but much stronger. The beans are covered with thick white ooze which tastes sweet but makes the whole thing look like the innards of some alien. The beans are almond shaped and sized, but smooth, they’re a creamy coffee colour, inside they are the most royal bright purple. The whole pod from inside out is an experience of colour and texture, shelling the beans has to be a fairly ritualistic practice moving through hard to soft to hard, ridged to slippery to smooth surfaces. The beans taste bitter but they come with a kick: 5 roughly equal an espresso shot. And they are rich. I’ve heard of people eating 30 and getting high, seeing the cacao god himself!
It’s said that cacao is a superfood: very rich in antioxidants, potassium, magnesium, dopamine, seratonin, anandamide, tryptophan and phenylethylamines are amongst the 300 chemical compounds present in cacao. With the seratonin, anandamide, dopamine and phenylethylamine it’s no wonder chocolate lifts one’s mood and why so many people reach for a slab when all else seems to fail. Of course the most healthy way to absorb all this goodness is through the fresh or dried bean, but that’s not so practical. They say that the addition of dairy products blocks the absorption of much of the benefits, so the darker the chocolate - and the least processed - the better for you.
This farm was a cacao plantation until the blight came. There are many trees left and we still harvest a good amount, enough to sell at the farmers' market and use in our bars and cookies. The harvesting is fun too: remove the beans and their white goop and throw in a gunny sack which gets hung undercover for 5 to 6 days. The beans ferment during this time and the white goop attracts the bugs and bacteria necessary for the fermentation. After the fermentation the beans are sun dried for maybe another 3 to 5 days and are then stored until needed. The major cacao traders and chocolate companies trade in these dried beans and the bigger chocolate producers have on average a 2 year supply of these dried beans. In Costa Rica cacao is at its highest price in years, but at barely $2 per kilo of organic dried beans, it's not really viable as a cash crop. Most cacao now comes from west african countries - hence the two year store as these countries are not so stable.
Back to my delicious task!

Thursday 12 February 2009

ginger scones

Having made my crystallized ginger I could make my scones. Delicious served warm with cream or butter.

1 cup wholewheat flour
1 cup white flour
1/4 cup ginger sugar (see post below)
1 teaspoon baking powder
1/4 teaspoon baking soda
1/4 teaspoon salt
1/4 cup chopped crystallized ginger (see post below)
1 stick butter (4oz)
2/3 cup buttermilk (or normal milk with 1 tablespoon lemon juice added to make up 2/3 cup. Let sit for 5 minutes before using.)

Mix dry ingredients. Finely chop the butter (easier if frozen) and rub into the dry mix until it looks like fine breadcrumbs. Stir in buttermilk with a knife. Turn out onto floured surface and knead VERY LIGHTLY, basically just shape the dough. Shape or pat into a round about an inch and a quarter thick. Using a knife score into 8 sections. Bake in a pre-heated oven at 400 degrees F for 15 - 20 minutes. Allow to rest for 5 minutes and serve with good strong hot tea.

ginger candy


It's time for the ginger harvest: the green shoots are dying back and the rhizomes are pushing up through the soil. Ginger is easy and fun to harvest, it's a simple treasure hunt as the first scraping away of earth reveals the newest and youngest roots and pulling them up reveals larger and older roots below, sometimes one can dig down through 4 layers of ginger. Replanting is simple too: one just snaps off nodules which have a greenish tinged bump, lets them air dry for a day or two then replant so that the bump is only just about below the soil. It's a little like planting potatoes or yams.

I've been making scones and was hankering for the ginger scones my gran used to make. First I needed crystallized or candied ginger. This is the recipe I used. It's a great recipe - not only does it make good, strong ginger candy, it also gives back ginger sugar and ginger syrup.

ginger root, peeled and sliced (the best way to peel ginger is by scraping it with a teaspoon)
sugar - white or brown
water

Boil the sliced ginger in a pan of water until tender, about 20 minutes. Drain, saving the liquid. Weigh your boiled ginger and return to the pan with the same weight of sugar. Heat 'til boiling, stirring occasionally, until the liquid has all but evaporated. Now you will have to stir constantly as the liquid disappears and the ginger goes from a syrupy mess to dry in a moment. Keep stirring until you have a pan of dry hard ginger pieces and a pile of sugar. Remove from heat and allow to cool. Keep the ginger pieces in an airtight container. They will last for up to 2 months if kept dry. The sugar can be kept and used in scones or to give a ginger flavour to cereals, tea, wherever you may use sugar. Now back to the syrup. The liquid you first boiled the ginger in should now be returned to the stove and mixed with sugar. The quantity will depend on how much liquid you have, boil the sugar liquid until it thickens stirring now and again. When about 1/3 - 1/2 has evaporated off pour it into a clean bottle and seal. Use this syrup to make ginger teas or for a cough or cold remedy, or to help with digestion.

Tuesday 10 February 2009

kitchen farm

While the farmer is off doing his thing, today working on a landslide area, I’m working in my kitchen farm, tending all my various shoots, microbes, bacteria, yeasts and fungi. It’s a wonder to be around such basic life forces, to bathe in the abundance of energy necessary for constant generation and growth. Bacteria, yeasts and fungi are the root sources of all life on earth, the parents to us all, and to watch them at work is very comforting. Life goes on regardless of what I think or feel or do. I just participate.

And so here I am surrounded by and happy in my kitchen farm. There are the sprouting mung beans and brown rice grains, smelling a little warm, full of promise and potential. The mungs have cracked their bright green coats and are sending out the first tendril of root, crookedly searching for a place to hold. The rice is just beginning, looking swollen and ready to waken into life.

On the window ledge the sourdough starter is fermenting. A mix of wholewheat flour and water welcoming the yeasts present in the air. It smells good; bubbles are beginning to form, testifying to the yeasts’ presence. What else can it be than magic that calls the yeasts? Every now and again the batter must be stirred to distribute the yeasts throughout the mix to encourage their growth.

Close by the kombucha vats squat. The kombucha is the mother hen of my kitchen farm. We have two vats, one for the market, and another continuous brew for ourselves. The continuous brew is fed daily and her fresh tea cools as we sit down to our breakfast. The market vat is created anew every week, drained and bottled on a Friday night and started afresh Saturday afternoon. The kombucha is not a true fungus, rather a community of bacteria, yeasts and enzymes called a scoby. The scoby feeds off the sugars and nitrogen supplied in the tea. As she feeds she produces an offspring that can be harvested each week, the scoby in our continuous brew is huge, perhaps 2 inches thick and 14 inches in diameter. Soon I will have to peel some layers off or we’ll run out of room for tea!

Below the vats, in a quiet little corner sits the kimchi. The kimchi looks like the sleepiest member of the farm, from the outside nothing much seems to be happening. But inside those big glass jars fermentation is happening at a frenzied rate as the lactobacilli bacteria essentially changes the chemical composition of the cabbage, carrots, cucumbers and homegrown green beans.

The busiest section of my indoor farm happens on the other side of the kitchen, though the process can spread all over the place by midweek. Here is the fungus proper, my dear rhizopus oligosporus. Tempeh. Just now I have two types and a new starter on the go, regular soybean tempeh and a black bean variation. In an attempt to keep my production more sustainable I’m looking for more local sources of legumes, soy doesn’t grow in Costa Rica: the closest place is the southern US. Black beans certainly grow here, though to be really sustainable I would use what we can grow on the farm. I could make tempeh from gandul (pigeon peas), yard long beans or perhaps winged beans, but only enough for home use. Soy has advantages too; it has the highest protein and is arguably the best tasting. But this is off topic for this post. My little rhizopus farm is a cozy place where each perforated Ziploc bag acts as a mini greenhouse for the creeping white mycelium. It takes about 20 hours to grow into harvestable tempeh. For the first maybe 12 hours there seems to be little change to the beans. Then as if by magic they begin to generate heat and thicken, becoming more dense and solid. After about 16 hours the first thin threads of mycelium can be seen, and by the 20th hour the beans can barely be spotted below a thick nap of soft snowy fungus.

The line between good healthy growth and rot is a narrow one. I tried making black bean tempeh from a can of pre-cooked beans. It took a long time for the mycelium to appear despite using extra spores and it never really took hold - other bacteria moved in and began to digest the beans into a smelly slimy mess. I guess I have weeds in my kitchen farm too.

Friday 6 February 2009

reforestation project


We're working on a reforestation project on the Pacific coast. It's a relatively small project, planting 3,000 trees, but it feels good to be involved. The land is old cattle pasture and of the 100 or so hectares, 80% is marked for reforestation with the other 20% being developed "ecologically". We are planning to create a 'natural' forest, not a plantation, which means looking carefully at the area and replicating what a natural forest would look like. It's difficult to find a 'natural' forest in that so many trees and plants have been introduced to Costa Rica, and the owners want to encourage birds and animals which means we'll be using some non native species as tasty treats to lure in macaws and monkeys. But we'll do our best to keep it as natural as possible meaning that we will intercrop around 30 species with mixed canopy, middle and understory trees. We will plant at good spacing giving the land opportunity to re-establish itself, with lots of opportunity for grasses and shrubs to grow. This will bring life back to the land as the initial plants will provide a living mulch and encourage mini ecosystems and communities for other plants and wildlife. This will also re-invigorate the soil and feed the saplings.
It's proving a challenge to find the trees. We have begun an on-site nursery using saplings we find on the land. There are a couple of organisations which will supply trees for reforestation projects, but mainly they supply plantation style trees and we are looking for a much more mixed style of forest. It's very interesting.

weather


We returned from the Pacific coast to a big storm. Rain lashing down overflowing the rivers and the roads, causing landslides and power outages. Not so much fun to drive through. Some places were hard to pass but we finally made it home to find the house wet and even the bed damp. That's the problem with having no walls. We are all of us huddled into the computer room, 4 dogs and two humans steaming gently with cups of tea and warm doggy dinners. It's good to be home.